vue路由的使用
1、定义组件
1 | <template> |
2、配置路由文件
1 | import Vue from 'vue' |
3、配置路由插座
1 | <template> |
4、路由文件注入到main.js文件中
1 | import Vue from 'vue'; |
配置路由的跳转
路由的跳转使用标签router-link
1、知道路径的跳转1
2
3
4
5
6<ul>
<li><router-link to="/">Hello页面</router-link></li>
<li><router-link to="/word">word页面</router-link></li>
</ul>
<!-- 定义路由插座 -->
<router-view></router-view>
2、to是通过绑定数据到上面1
2
3
4
5
6
7
8
9
10
11
12
13
14
15
16
17<ul>
<li><router-link to="/">Hello页面</router-link></li>
<li><router-link :to="word">word页面</router-link></li>
</ul>
<!-- 定义路由插座 -->
<router-view></router-view>
<script>
export default{
name:'app',
data(){
return{
title:'我是项目主入口',
word:'/word'
}
}
}
</script>
定义子路由(嵌套路由)
1、定义路由跳转1
2
3
4
5<ul>
<li><router-link to="/word/router1">路由1</router-link></li>
<li><router-link to="/word/router2">路由2</router-link></li>
<router-view></router-view>
</ul>
2、路由的跳转(router.js)1
2
3
4
5
6
7
8
9
10
11
12
13
14
15
16
17
18
19
20
21
22
23
24
25
26
27
28
29
30
31
32
33import Vue from 'vue'
import Router from 'vue-router'
import Hello from '@/components/Hello'
import Word from '@/components/Word';
import Router1 from '@/components/Router1';
import Router2 from '@/components/Router2';
Vue.use(Router)
export default new Router({
routes: [
{
path: '/',
component: Hello
},
{
path:'/index',
component:Word
},
{
path:'/word',
component:Word,
children:[
{
path:'router1',
component:Router1
},
{
path:'router2',
component:Router2
}
]
}
]
})
路由之间传递参数params方式
1、路由跳转的时候定义要传递参数形式
1 | { |
2、页面跳转的时候传递参数
1 | <!--123就是传递的id值--> |
路由之间传递参数query方式
1、在路由跳转地方传递query参数
1 | // 带查询参数,变成 /word/router2?id=123 |
2、在组件的mounted中接收
1 | export default{ |
区别:直白的来说query相当于get请求,页面跳转的时候,可以在地址栏看到请求参数,而params相当于post请求,参数不会再地址栏中显示
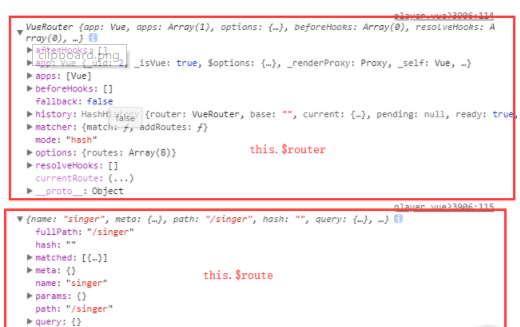
拓展:this.$router 和this.$route有何区别?
1.$router为VueRouter实例,想要导航到不同URL,则使用$router.push方法
2.$route为当前router跳转对象,里面可以获取name、path、query、params等
注意:传参是this.$router,接收参数是this.$route,这里千万要看清了!!!
2
3
4
5
6
7
8
9
10
11
12
13
14
15
16
17
18
19
20
21
22
23
24
this.$router.push({
path:'/xxx'
query:{
id:id
}
})
接收参数:
this.$route.query.id
传参:
this.$router.push({
name:'xxx'
params:{
id:id
}
})
接收参数:
this.$route.params.id
注意:params传参,push里面只能是 name:'xxxx',不能是path:'/xxx',
因为params只能用name来引入路由,如果这里写成了path,接收参数页面会是undefined!!!
最重要的一点,params刷新会消失。。。query则不会
关于vue脚本中操作页面的跳转及传递参数
1、使用push实现页面跳转
1 | methods:{ |
2、使用replace实现页面的跳转
1 | methods:{ |
关于前进与后退
1、页面代码
1 | <input type="button" value="前进" @click="next"/> |
2、事件方法代码
1 | methods:{ |
重定向
1、配置路由
1 | { |
2、配置页面跳转(组件)
1 | <li><router-link to="/word/router">路由4</router-link></li> |
3、重定向函数
1 | { |